The "5-year" plan

When we moved into our house in 2005, we had agreed that it was a 5 year plan. In five years, the house would be painted and landscaped to our tastes. It would be done...

It's 2011.
The projects are never-ending, we have a dirt mound in our driveway the size of a suburban, It's dark out and we're still working... hit it.

Welcome to our journal about dirt, gardens and beer.
Showing posts with label pond. Show all posts

Sunday, April 29, 2012

The New Pond Area In Detail

The new pond area in detail.

let's get down to the nitty gritty...How did we do it?

Materials List:
Campanula 'Glometera Superbra' x 12
Iris 'Silver Edge' x 9
Fern 'Japanese Painted Fern' x5
Coreopsis 'Dream Catcher' x 3
Geranium 'Sanguineum' x 3
Stachys 'Hummelo' x 3
Liriope ' Varigated' x 3
Pulmonaria 'Raspberry Ice' x 5
Brunnera 'Looking Glass' x 3
Hosta 'Great Expectations' x 1
Hosta 'Wide Brim' x 1
Hosta ' Remember Me' x 1
Hosta 'Spilt Milk' x 1
Hosta 'Guacamole' x 1
Hosta 'Bright Lights' x 1
Hosta 'Patiriot' x 1
Hosta 'Sun Power' x 1
Azalea 'Nova Zembla' x 2
Ajuga 'Bronze Beauty' x 12 (so far, but need more)
Lysimachia 'Aurea' x 6 (so far, but need more)
dwarf fothergilla x 1
 Assorted Sedge(s) x 5

STILL NEED: Foamflower (3), Coral Bells (2) and many bulbs for spring color. 
Total number of plants to complete this area: 85 + spring bulbs.


This is how it started.
A girl, a pencil and a plan
                                                                             CHANGE IN PLANS:  Along the way, plans changed.  You'll notice that originally I didn't plan for the dry creek bed.  It wasn't until I started cutting and filling the area with dirt and soil ammendments that I realized that we had to reconfigure things.  Originally, I had also planned for Olga Mezitt Rhodos and Sedum.  That changed as well.  I just couldn't find Olga, and realized that Sedum would not get the necessary light requirements.  The Olga's were swapped out for Nova Zemblas and Brunnera was substituted for Sedum.  To the left is the rough sketch of what my vision was for the pond area.  We also had to change locations of plants during installation as we were battling some hefty tree roots.

PLANT / MATERIALS ACQUISITION:  During the initial planning stages I also took finances into consideration.  We had the menards cards to purchase shrubs and "fillers".  Further, buying perennials from an online nursary saved us a bundle!  This is the first time I used GORGE TOP GARDENS and I must say that I was quite impressed.  The plants arrived healthy and really well cared for.  At the time they also offered $8.95 flat rate [any size order] shipping.  I think It's now $10.95, which is still unbelieveable.  YOU CAN'T BEAT THAT.  www.gorgetopgardens.com/

Check them out if you are doing any big landscaping projects.  You won't have immediate gratification, but all good things come to those who wait. 

Most of my hosta have come from CONTRARY MARY'S.  Mary knows her stuff!  My husband and I went there with a basic idea of what color/size hosta I wanted and Mary had it OR even better, she'd one-up it!  If you are not in the Minooka, IL area...she's online.  www.contrarymarysplants.com/

The dirt and cobblestone came from ILLINOIS LANDSCAPE SUPPLY.  Great People, very friendly.  Same day delivery available.  Again, reasonable prices. www.illinoislandscapesupply.com/

TIMELINE:
 We Started the project April 8th (Easter Sunday) and it has taken roughly 3 weeks to complete. 
This timeline also includes the installation "Grandma's garden", and "Tsinat's garden". 


STAY TUNED...
MORE INFO/PICTURES TO COME AS THINGS MATURE!!

Thursday, April 26, 2012

Lofty Hopes and Dreams

PROJECT 1.
THE NEGLECTED BACK YARD.

Lofty hopes and dreams.  That's how every story begins...

I love gardening magazines.  I love the look of lush, full plantings with pathways leading you...wait...begging you to explore further.  Along the way you find hidden treasures that give you some insight to the homeowners personality.  Birds sing to you as you continue your journey, stopping only to admire the way the light plays off the color of the leaves and the different textures that were used in the bed.

STOP. 
The image I just created was NOT my backyard.

I wanted it to be my backyard, but it wasn't. 
So this year we decided to make the dream a reality.  Let's start with some before images and descriptions. 

CONS:
  • Our gutter downspout pops up right in a prime planting area, making it difficult to landscape around it.  You can't use mulch around it and you have to be cautious what you plant.  The back yard is also on a slight slope, so the water from the pop up downspout will wash away anything in its path (not just the immediate area around it)
  • We have a large maple tree that the previous homeowners planted SMACK DAB in the middle of the back yard, also making landscaping difficult.  This tree means that much of our back yard is shaded / part shade.  The light itself is not a problem, but the location of the tree is.
  • The gazebo takes up quite a bit of space in the backyard leaving only a small area for the pond itself.  Any hopes of making the pond larger simply aren't possible without removing either the tree or the gazebo. 
  • When we installed our fence, it left a very narrow area on the side of the gazebo, also very shaded.
This is how the "Lilac Meadow" started in 2009
PROS:
  •  When we installed our fence, it left a very narrow area on the side of the gazebo, also very shaded.  This gives me the ability to create a secret, secluded area in the yard because it is not visible from the backdoor.


Another picture of the "Lilac Meadow". This was taken in 2011. 


  • There are SO many wonderful perennials that can be placed in shade / part shade. 
  • By increasing the size of the pond flower bed itself, we also immediately created paths to get to and from different areas of the yard.   


Our projects this spring have included:

1.) I finished off the edges in the lilac meadow with some decorative bricks that matches the previously installed raised bed ( note the lower left side of the picture.)  We filled in the newly edged beds with dirt.  It will be home to hosta, primrose, astilbe, spiderwort and lamium. Currently, only a few hosta and the spiderwort are planted.  More pictures will be posted in the coming weeks as to how this area is progressing.  In the distance is the "secret garden"  I am looking for an old wrought iron gate to use as a gate to keep the dogs out of the veggies and hops.


2.) We've also added additional beds in front/around our raised vegetable garden.  One of them I affectionately call "grandma's garden".  It will be home to peonies and poppies.  These flowers remind me of both of my grandmothers.  One grew the most beautiful peonies, and the other belonged to the VFW.  Every year we sold buddy poppies.  I was buddy poppy queen when I was younger.  :) 
Currently only the peonies are installed. 

When we dug out the area around the pond, several daylilies had to be relocated.  Because I loved the look of the salvia, daylily and lavender combo in the front; I mimicked this in my backyard.  I absolutely love the color, texture and contrast of these plants.  They are in the lower bed. 

The big plastic covered mound in the background is sod.  It is sitting in what should be one of our vegetable gardens. At least it's not in the driveway!  :)
The new areas are desperately in need of mulch, which hopefully we will be doing the first weekend of May.


3.) We also installed a wonderful shade / part shade bed which includes a hydrangea bush, Solomon's seal, goats beard, hosta, columbine, toad lily, and carex.  On the edges of the bed that receive more sun we have creeping phlox, coneflower and black-eyed susan.    We sponsor a child in Ethiopia.  Her last name is Solomon.  I wanted to create a bed so that I could plant Variegated Solomon's Seal to remind me of her.
 
REALITY CHECK:  IF YOU ARE NOT AWARE OF THE FAMINE / DROUGHT IN AFRICA PLEASE EDUCATE YOURSELF ON IT.  IT IS DEVASTATING.  IF YOU ARE ABLE PLEASE HELP.  We found our sponsored family through Childfund International, but there are many organizations that have been founded to help those in Africa.  We are fortunate enough to have the EXTRA water for a flower garden, they are not fortunate enough to have even enough water to drink or grow FOOD.  Puts things into perspective doesn't it?


4.)  We placed rock in front of our back gate to tie into the pergola area.  I have a thing for curved lines and it was always just a bit off in my eye.  We had just enough rock left to fix it.  Lex is currently growing about 100 irish moss now to fill this area.


Before

After


5.) THE GRAND FINALE:

  We increased the size of our pond area and planted several perennials.

The goal was to tuck the pond away behind lush plantings. In our case there will be 5 hosta and various other plants in the foreground.  We solved the drainage issue by creating a dry creek bed that runs along side the bridge, the rest of the area outside the "creek" will be mulched. 


To fully enjoy the view of the pond you will need to venture down the path toward the bridge, stopping to watch the ornamental grasses swaying gently in the breeze.  Your eyes then notice the delicate foliage of the ferns against the contrasting broad leaves of the hostas.  Listen as the busy bumbles are flying from flower to flower enjoying their sweetness...birds sing to you as you continue your journey, stopping again to admire the way the light is playing off the color of the leaves and different textures that were used in OUR bed.

Lofty hopes and dreams.  That's how every story begins...

Tuesday, April 24, 2012

Change of Plans

Spring has sprung at the Bonam's, the projects have officially begun.

So remember the project list from last month? 

Plans changed.  We decided that rather than doing the arborvitae, we would concentrate on our neglected backyard. 


SOME HISTORY:  A few years back we installed a smallish prefab pond.  It was cute, I loved it.  It was well planted the first year.  We bought beautiful koi to put in the pond and even installed lights to enhance the pond for night viewing.  It was a great summer.  Radio margaritaville and BBQ every Saturday night the first year.  The pond wasn't / isn't deep enough to winter the koi, so all but ONE were brought into the house.  "Orange Blossom" was our guinea pig to see if they could survive the winter in the pond.   We continued to love them and feed them all winter.  Orange Blossom hibernated in the pond outside.  The inside koi ate from your hand and grew like crazy. 

Spring came and it was time to move everyone outside...WITH ORANGE BLOSSOM.  Orange Blossom survived the winter and also grew like crazy.  We waited until it was warm enough and the pond was ready.  The move went well, everyone acclimated into the pond and seemed very happy.  The next morning I woke up to Lex standing at our bedroom window saying "honey, wake up.  you have to see this".  I stumbled to the window (still half asleep) to find a large white bird standing in our pond with its head down.  I FLEW down the stairs with our shepherd in tow, shoved him out the backdoor and we raced to the pond.  

Needless to say, most of the koi were gone.  It was devastating.  We replaced a few koi (which in frustration I named them Sushi and Ceviche).  We had to place a large net over the top of the pond to prevent our new koi from living up to their name.  Now I couldn't plant anything in the pond because of this large net.  To say the least, I was very discouraged.  Who would have thought that a heron would choose our SMALL pond for breakfast? 

Months passed.  We restocked the pond. They were becoming more friendly and they too ate out of your hand.  We didn't reinstall the lights and again... nothing was planted.  Frustration caused the pond area to fall into a state of neglect.  The pond was nice, but that's about it.  We still had Buffett & BBQ on Saturday night, but the ambiance of the pond was absent.


THIS YEAR: When "spring" arrived (early) this year we did our yard clean up and trekked around the property deciding what to do this year.  I found that after each exhausting day in the garden we would retire to the front porch for our victory beer and cigar.  Hence, the need for the arborvitae for more privacy in the front. 

Now, our backyard is visible from our large back door/windows in the kitchen.  It [the backyard] became our "dirty little secret".  Everyone saw the beautiful exterior, but no one saw the nightmare that was our backyard.  Landscaping follies.  Yes I had many.  I used small rock as mulch around the pond area.  ROCK.  Do you know how hard it is to plant and dig in rock?  This is another reason that the area never got finished.  We couldn't figure out [at the time] any other way to keep mulch from washing into our pond, so this was our answer.  We had a tree ring that was right next to the bridge to go over the pond.  We went through installing waterfalls that didn't work the way they should, a waterfall that looked terrible and a fountain that stopped working.  The pond area has been a royal pain in the...let's just say it's been a headache.  Last year my mother painstakingly picked up each and every rock/pebble around the pond in her free time.  On a side note she told me that she would beat me if I ever used small rock as mulch again.  We had lofty ideas for the back yard, but it just kept going to the back burner.

Then it came to us.  Let's finish the back.  enjoy our BACKYARD.
So this is what the next few posts are about.

OUR CHANGE OF PLANS.

THIS IS OUR "BEFORE" PICTURE


Tuesday, May 31, 2011

where do I start?


So much has happened since we last updated our blog.


I'll start with today.
   
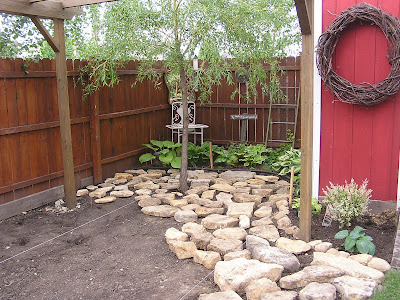
We went from this...


That big bad boy leaning against the fence is dubbed "the widow maker".  It is standing about 4 feet tall and about 2 1/2 feet wide.  It weighs about 250 pounds.  I shimmied it into place today [mostly] by myself.


 To This!


     Every Sunday morning over the past few months, we collected rock... TONS of rock.  We had stored it in our garage in anticipation for this week.  The weather (and our backs) hadn't been cooperative over the past few days. Unfortunately we got a late start getting the stone laid under our pergola. 

     On Saturday I threw out my back.  Bummer.  After a few days of light work and rest, mine had improved.  I was ready to rock and roll.  Today we got up early and tilled the ground under the pergola.  Lex bent over to get a stone and BOOM, that's when it happened.  His back went out... game over.  Straight to the couch for Lex.  It didn't deter me.  I was on a mission.  See the rocks in the picture above?  I moved and placed them ALL!  That's right... I AM WOMAN HEAR ME ROAR.  
At least that's how I felt until I tried to lift some of the really big ones.   
Then it sounded more like a meow.  
I need help with those.  Hopefully after a trip to the chiropractor, Lex will be ready to go tomorrow.  

To complete this project, we have to:
  • Finish about 1/3 of the rock "floor"
  • Fill in between the stones with dirt
  • Re-build the fire pit
  • Plant ground cover
  • Move the furniture back under the pergola
  • Re-hang the "chandelier"
  • Re-hang the decorative windows
---------------------------------------------------------------------------------------------------------

We have also turned an antique water pump into a fountain for our pond.  


Pay no attention to the plants, rocks and other craziness around the pond.  We are in the process of re-doing the entire area.  It was done in the "pre-landscaping school phase".  Let's just say... it's not planted so nice and needs (a lot of) help.  Over the past few years this pump sat in our native prairie garden.  This year we decided to make it functional AND aesthetic.  More pictures to come over the next few weeks.


Aw... here they are begging for food.  aren't they cute?
This is our native prairie garden.  The pump used to be where the antique milk jug is now.  I picked up this little number this past weekend at a GARAGE SALE for $10.  I love thrifty garden finds!


---------------------------------------------------------------------------------------------------------

Yesterday Lex turned an old sink into a fountain... 

I saw this sink at an [overpriced] garden store a few years ago and just had to have it.  I knew the perfect place for it.  I was so excited to get it home and put it IN THE FRONT YARD. 

Are you loving the ugly mirror?  GARAGE SALE FIND.  $8

Now, I know what you're thinking... CLASSY, this woman has taste.
And to answer your second thought:  NO we do not have a toilet with flowers planted in it.  

This look [in the front yard] was straight out of Better Homes and Gardens... NOT

After we came to our senses we decided to move the sink to the backyard.  We had no idea what we were going to do with it, but we knew we just couldn't have it in our front yard any longer.  So we put this thing in the willow courtyard and hung a mirror over it.  It looked better there, but there was always something "a little off" about it.  We went through a phase with flowers being planted in the bowl... but I still didn't like it. 
Then one day...[light bulb turning on]...it hit me.  It has a spigot.  YES.  We could turn it into a fountain.  Now, I LOVE IT.  It looks cute.  After 3 years, I am finally happy with the "kitchen sink".

There it is in the back corner with all of our hosta.